In this Node-RED SNMP tutorial, we’ll cover how to monitor the ink levels of printers and be alerted when the ink levels fall below a defined threshold. We’ll build and use a Node-RED flow, to set up SNMP triggers for new printers without user intervention.
This includes the following:
- What is Node-RED?
- How SNMP works?
- What is MIB?
- How to manually add SNMP Sensors on a new device?
- How to automatically add SNMP Sensors on a new device?
- Set up SNMP sensors on a printer
- Set up the Node-RED flow
Let’s start with the basics. Read below, in short, what Node-RED is and what SNMP is.
What is Node-RED?
Node-RED is an open-source, flow-based programming tool for wiring devices, APIs, and online services. It provides a visual interface for building Internet of Things (IoT) applications.
What is SNMP?
Simple Network Management Protocol (SNMP) is a set of protocols for network management and monitoring. It’s an application layer protocol for monitoring the network, detecting network faults, and sometimes even configuring devices remotely. In short, it helps you manage thousands of devices more easily.
In other words, SNMP is a powerful tool that can help you better monitor and get alerts for essential networked devices, from printers to storage arrays.
Check out our full guide about what SNMP is and how SNMP works.
Introduction to automating SNMP monitoring with Node-RED
For example, in this tutorial, we will explain how to monitor printer ink levels. However, you can apply and use the very same approach in many different scenarios, including:
- Disks utilization
- CPU
- Temperatures
- And many others
To monitor the ink levels on a printer, you’ll need to set up different SNMP sensors – one for each of the colors of our printer. Then, you’ll need to add an alert when one of these values falls below a specific threshold.
For instance, we want to receive an email when the black ink falls below a 10% capacity.
The Printer-Management Information Base (MIB) is essential for this process.
What is MIB?
A Management Information Base (MIB) is a hierarchical collection where each entry is addressed through an object identifier (OID). Each OID is a managed object containing a specific value. For instance, there is an OID that lets us retrieve various information. Some of these might include the temperature of the CPU, the disk utilization, the disk capacity, and others to get information about the ink levels. Learn more about finding SNMP OIDs.
There are many different MIBs – some are standard, and some are vendor-defined. Here, we’re concentrating on the Printer-MIB described in the same MIB as “The MIB module for management of printers.”
The majority of printers support the MIB standard. In this MIB, the OIDs are as follows:
- prtMarkerColorantValue: The name of the color of this colorant
- prtMarkerSuppliesLevel: The current level of this supply
How to manually add SNMP Sensors on new devices?
The first approach we’ll explain is how to manually add the required SNMP sensors every time a new printer appears on one of your monitored networks.
This process requires several manual actions from you.
First, you need to know when a new printer appears on the network. This can be a difficult task to complete, especially if you’re monitoring many networks.
Second, you must search for the new device and manually add the required sensors. However, you should note that there can be a considerable list of sensors you may need to add.
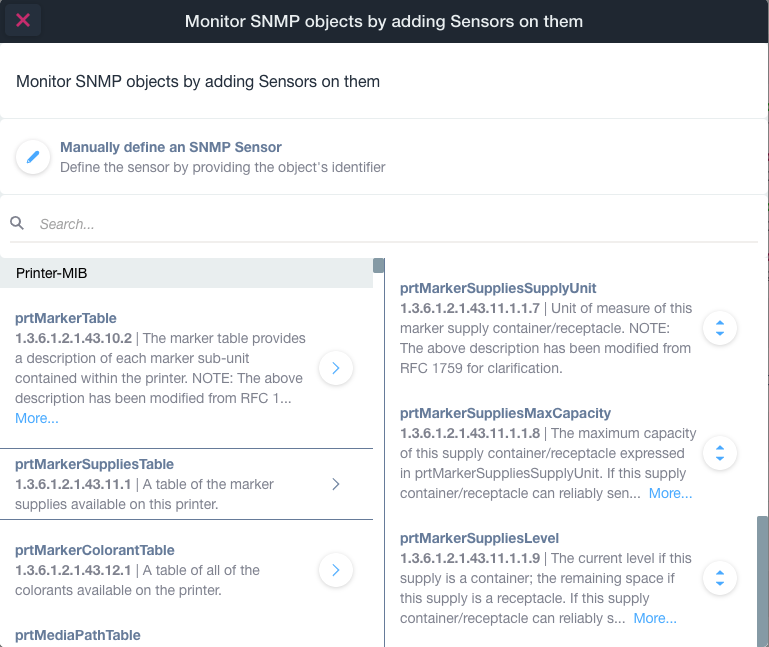
Domotz network monitoring software can help with simplifying this process. To clarify, Domotz autonomously discovers all the MIBs supported by each of your devices.
For instance, with the SNMP Sensors functionality Domotz will help you see the Printer-MIB description. In addition, you can see all the other MIBs supported by the device. As a result, you can manually identify the OIDs where you need to add the sensors, like the prtMarkerSuppliesLevel OID of the prtMarkerSuppliesTable.
How to automatically add SNMP Sensors on new devices?
The second approach is how to automatically add all the sensors you need without the intervention of an operator. This automated process has many advantages. For instance, you don’t need to know where and when a new printer appears on the network. In addition, you don’t need to add sensors every time such an event occurs.
If you want to benefit from automating this process, you’ll need the following ingredients:
- A configured printer which the template can be exported from
- Domotz Public API, templates, and webhook notifications
- Node-RED
You can follow this process:
Choose one of our already configured printers as the “template” from which we copy the configuration for the new printers. Remember to previously configure this printer with all the SNMP sensors we want to add to all the printers.
Export the Domotz Template from the printer you’ve already configured. We leverage the Domotz Public API to add to the new printers the same sensors and triggers saved in the template every time we receive a webhook notification regarding the discovery of a new printer supporting the Printer-MIB. In this tutorial, we also use Node-RED to perform the Domotz API calls automatically.
How to set up SNMP sensors on a printer?
Generate a template with the sensors we want to add. Then you can start to automate the addition of sensors and triggers.
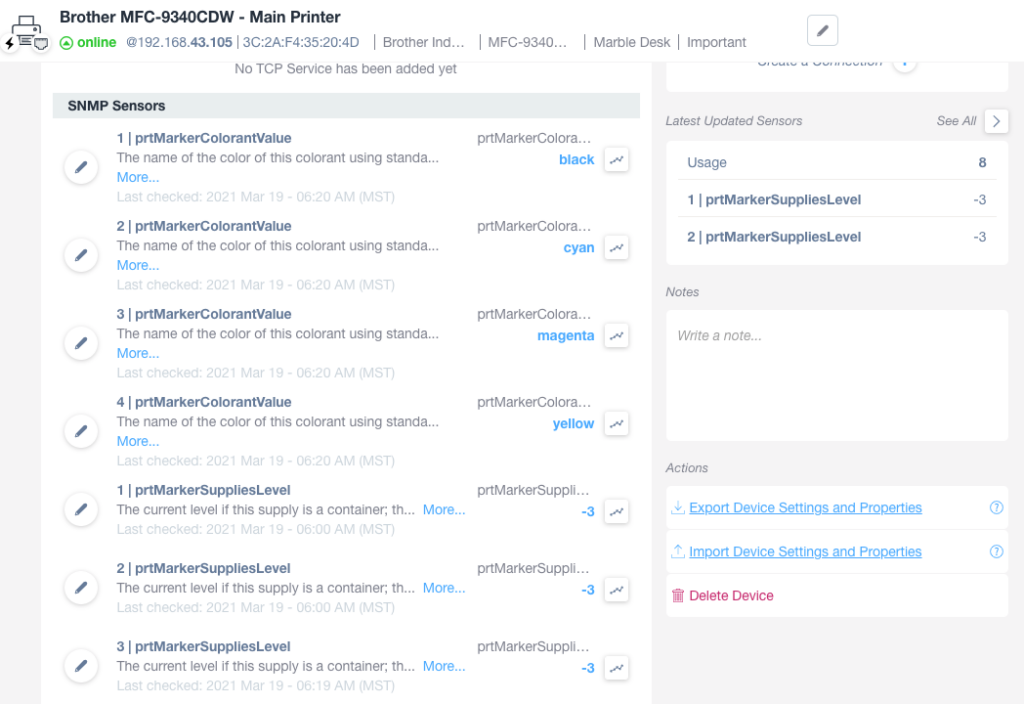
- Navigate to the device details of the printer that is already configured
- Export the configuration using the “Export Device Setting and Properties” button
As a result, you’ll get a JSON file containing all the configurations of the device, including the SNMP Sensors and Triggers:
Now, you can start setting up the mechanism to automatically add all the SNMP sensors and triggers to your new printers. We will cover all the necessary steps while building a Node-RED flow.
Set up the Node-RED flow
To set up the Node-RED flow, you first need to install it. For the installation instructions of Node-RED, please refer to the official guide. You can install the Domotz node from the ‘manage palette’ menu of Node-RED. Just search for node-red-contrib-domotz and install it.
In this flow, we have a composition of several Node-RED concepts already introduced in previous tutorials:
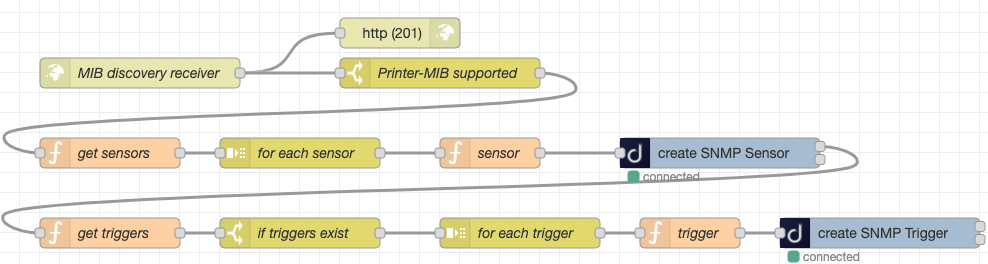
Consider these steps to set up the Node-RED flow:
- Load the Domotz template for the Printer-MIB and store the sensors and triggers
- Receive the webhook relative to the discovery of a new MIB in a device
- Check if the device supports the Printer-MIB (if the device supports the Printer-MIB we continue the flow otherwise we stop the processing of the message)
- Create all the sensors and triggers contained in the template for the new device
In the following, we describe all the steps required for the two flows:
The first flow includes loadig the Domotz template, convert the content to JSON and save the template.
The second flow includes setting the notifications.

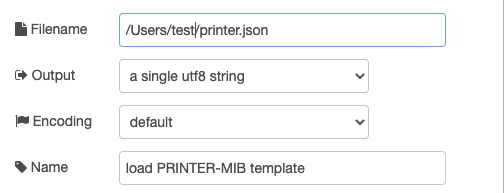
1) Load the Domotz template
Load the previously saved Domotz template that contains the sensors and triggers that you must add.
2) Convert the content to JSON
Exploit the ‘file in’ node and the ‘json’ node. The former loads the content of a file and requires the path to the template you want to load, the latter converts the loaded content in the JSON format.

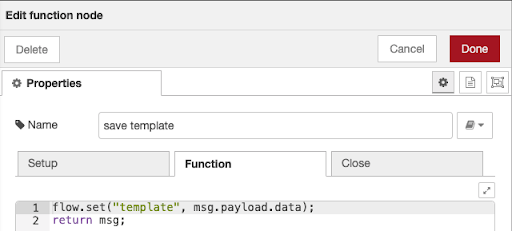
3) Save the template
Save the template content inside the “flow” variable using a function node. Node-RED provides a way to store information that can be shared between nodes without using the messages that pass through a flow. This is called a Node-RED context. This allows you to refer to the template information stored in the flow context. In addition, thanks to the context, you can load the template just once instead of loading it every time we receive a notification.
4) Set up notifications
For this aspect, you need the “HTTP in” node to create the web server that will receive the webhooks. This is the same setup we wrote about in a previous blog post on Webhook management with Node-RED. In addition, consider reading through an HTTP in node example from Node-RED.
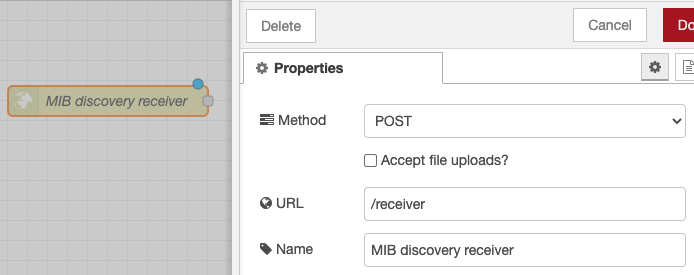
The HTTP-in node is a receiver node. Any HTTP client expects a response. For this reason, you need to create an HTTP response node. Domotz Webhook service expects a response with code 201 and an empty body. As a result, you can directly attach the HTTP response node to the output of the HTTP in a node.

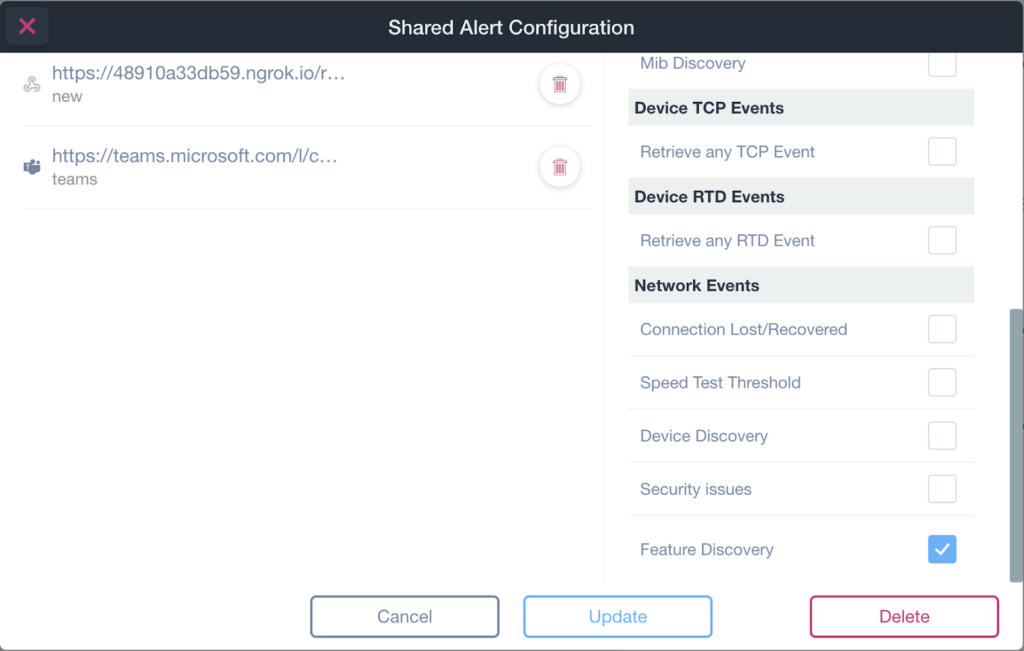
The next step is to subscribe to the Feature Discovery events. By doing this, you set up the configured HTTP-in node as the webhook receivers. Simply open the Domotz Shared Alerts section and add the HTTP-in receiver address to the webhooks able to receive all these events:
Consider that when you receive a notification, the payload contains valuable information that you can exploit in our flow:
- The agent_id and device_id of the notification. These values are required to add the sensors and triggers to the notified device.
- A list containing all the new MIBs that Domotz discovers automatically to be supported by the device having device_id value.

Pay attention along the process to verify if the device received in the webhook supports the Printer-MIB:
- If the device does not support the Printer-MIB, you stop the processing of the webhook.
- If the device supports the Printer-MIB, you can continue with the subsequent nodes.
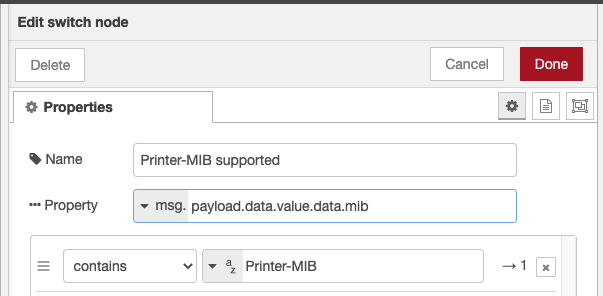
Analyze the content of the webhook with a Switch Node to quickly understand if the device supports the Printer-MIB. You can select multiple properties that must be present in the content to permit the continuation of the analysis with this node.
In this case, it is enough to check if the content of the webhook contains the Printer-MIB name inside the MIB collection of the payload.
5) Add the sensors and triggers
To add the sensors and triggers from the template, follow these steps:
Step 1: Create a function node to extract all the Domotz sensors from the loaded template
Extract the sensors from the template using the OID_sensors variable. You can find it in the previously saved context and set all the sensors as the new msg.payload.
In addition, set the message data with the agent_id and device_id that must be propagated to the subsequent nodes. Thanks to a function node, you can perform all these operations.

Step 2: Split the above message into many messages
Create a sequence split node to generate a different Node-RED message for each sensor from the template. In this way, the message flow processes will become multiple messages – one for each template sensor.
The default split node is enough for our use case because it splits one message into multiple messages dividing the array contained in the msg.payload value.
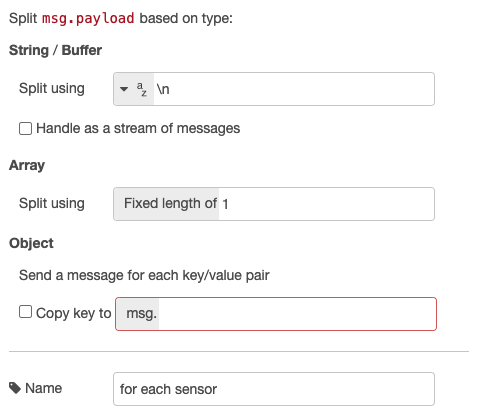
The output of the split node will be many messages, one for each sensor.
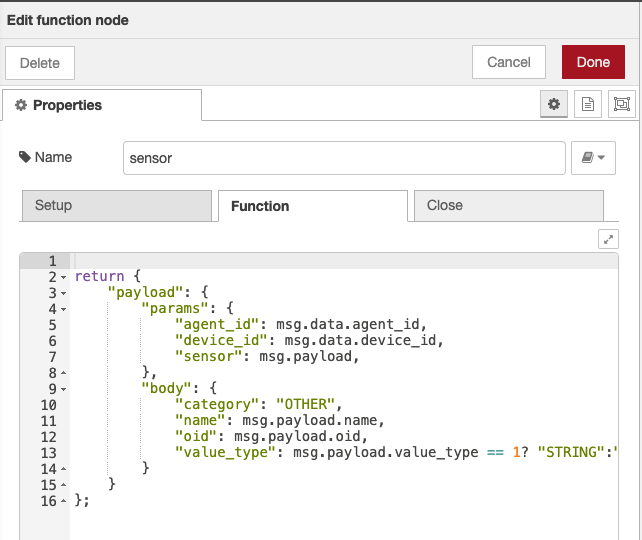
Step 3: Create a function node to prepare the playload
You’ll need to create a function node to prepare the payload to add the sensor according to the Domotz API call to create an SNMP Sensor. Prepare the payload similar to the payload required in the create SNMP Domotz API call documentation.
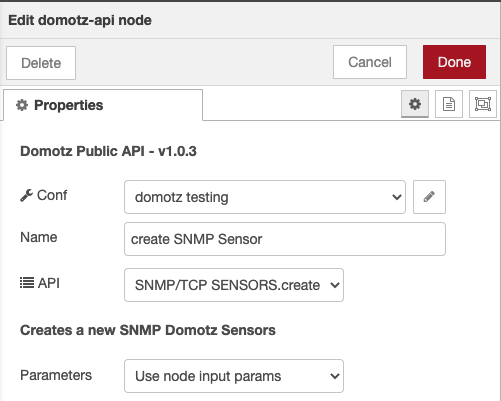
Step 4: Create a Domotz node to perform the call to the Domotz API
Finally, you can perform the call to the Domotz API to add each sensor. You’ll use the Domotz node provided by the node-red-contrib-domotz package for Node-RED previously installed. It is enough to select the create an SNMP Sensor function from the API drop-down list and set the “Use Node Input Params” in the parameters property. This configuration uses the input to the node to construct the payload sent to Domotz. The API’s URL is enriched with the params property (i.e., agent_id and device_id). Instead, the body payload is constructed from the body previously set in the function node.
The steps to add the triggers are analogous to the ones to create a sensor. We first extract the triggers from the template, and for each trigger, we prepare the payload and call the create SNMP Trigger API call.
Your Node-RED SNMP automation waits for MIBs
In conclusion, the flow you built is now waiting for a webhook notification indicating the discovery of new MIBs in our devices. Every time you find that one of your devices supports the Printer-MIB you let the message process on all the flow nodes.
In the end, you’ll get a device enriched with all the sensors and triggers you would like for a device supporting the Printer-MIB. This will permit you to receive all the required alerts when the ink levels fall below the defined threshold.
Further reading:
- How to build a custom Node-Red dashboard for IoT, SNMP, and more.
- How to set up a webhook management system using Node-RED.
- Guide to server room temperature monitoring
- Power BI API
- What is management information base
- How to find SNMP OIDs for monitoring